
NextJS seems to be the hottest framework to build your next project. Everyone can deploy to Vercel or Netlify including you and me.
But did you know, both Netlify and Vercel uses AWS Lambda functions with NodeJS runtime to render your app on the server?
You may now ask:
Okay, what’s the problem?
Lambda functions have cold start - which means if someone visits your app for the first time, it will take at least 200ms to load a basic website.
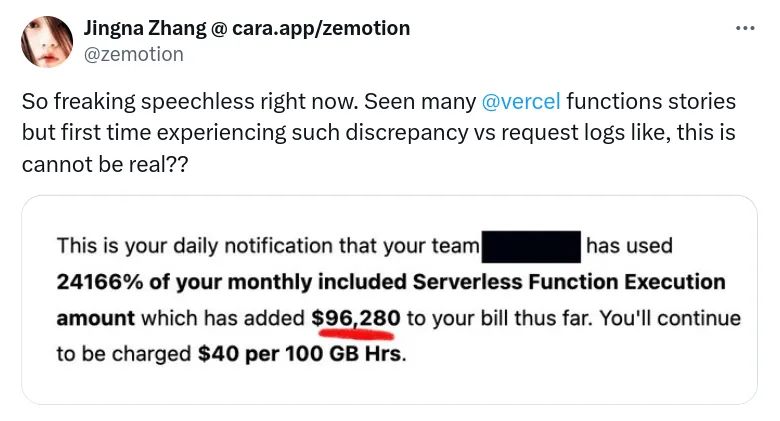
Hosting your NextJS app on EC2 will cost you way less - than you would spend doing the same on Vercel or Netlify.
If we host our NextJS app on a virtual machine like Amazon EC2, we can eliminate the cold start and our app will become faster for everyone.
Important
I know that there are a lot of pros and cons of hosting your server on Vercel or EC2, but we will discuss them some other day in details.
Today, let’s learn how to deploy a NextJS app on EC2 with custom server.
Launch an Amazon Linux EC2 instance
First, go to AWS Console for EC2 and select Amazon Linux 2023 AMI and 64-bit (Arm) Architecture.

In the instance type you can select whatever you want. Here I am going with the cheapest instance, which is t4g.nano which will give us 2vCPU and 512 MiB of RAM.
This t4g.nano instance will cost you just $3/month in us-east-1.

In Key pair select or create a new SSH key pair for your instance.
We will need this to login.

In the Network section allow HTTP and HTTPS traffic, you can also select existing security group as well.

Now Launch instance with the default storage config by clicking on Launch instance on the bottom right.

Our EC2 instance was created with this success message: Successfully initiated launch of instance (i-xxxx)

Connect to EC2 instance via SSH
Go to your instance, find and copy the public IP by selecting the instance:

Use the SSH command with IP
We will be using rsync, so it’s best to connect using the terminal.
Alternatively, you can use the connect button to directly get the command or connect to EC2 from the browser itself.

The default username for Amazon Linux EC2 instance is ec2-user.
ssh -i your-key.pem ec2-user@your-ip-address
Type yes and save the fingerprint:

On successful login you’ll see the Amazon Linux logo:
   ,     #_
   ~\_  ####_        Amazon Linux 2023
  ~~  \_#####\
  ~~     \###|
  ~~       \#/ ___   https://aws.amazon.com/linux/amazon-linux-2023
   ~~       V~' '->
    ~~~         /
      ~~._.   _/
         _/ _/
       _/m/'
Last login: Mon Jun  3 13:15:51 2024 from 49.36.180.53
[ec2-user@ip-172-31-19-82 ~]$
Install NodeJS on EC2 (Amazon Linux)
Simply run sudo yum install nodejs.
You’ll see something like this, type y and hit Enter.
[ec2-user@ip-172-31-19-82 ~]$ sudo yum install nodejs
Last metadata expiration check: 0:23:36 ago on Mon Jun  3 12:56:21 2024.
Dependencies resolved.
========================================================================================================================================
 Package                        Architecture          Version                                           Repository                 Size
========================================================================================================================================
Installing:
 nodejs                         aarch64               1:18.18.2-1.amzn2023.0.4                          amazonlinux               1.8 M
Installing dependencies:
 libbrotli                      aarch64               1.0.9-4.amzn2023.0.2                              amazonlinux               316 k
 nodejs-libs                    aarch64               1:18.18.2-1.amzn2023.0.4                          amazonlinux                14 M
Installing weak dependencies:
 nodejs-docs                    noarch                1:18.18.2-1.amzn2023.0.4                          amazonlinux               7.6 M
 nodejs-full-i18n               aarch64               1:18.18.2-1.amzn2023.0.4                          amazonlinux               8.5 M
 nodejs-npm                     aarch64               1:9.8.1-1.18.18.2.1.amzn2023.0.4                  amazonlinux               2.0 M

Transaction Summary
========================================================================================================================================
Install  6 Packages

Total download size: 34 M
Installed size: 184 M
Is this ok [y/N]:
Once installed you will see something like this:
Transaction Summary
========================================================================================================================================
Install  6 Packages

Total download size: 34 M
Installed size: 184 M
Is this ok [y/N]: y
Downloading Packages:
(1/6): libbrotli-1.0.9-4.amzn2023.0.2.aarch64.rpm                                                       4.6 MB/s | 316 kB     00:00
(2/6): nodejs-docs-18.18.2-1.amzn2023.0.4.noarch.rpm                                                     35 MB/s | 7.6 MB     00:00
(3/6): nodejs-18.18.2-1.amzn2023.0.4.aarch64.rpm                                                        7.6 MB/s | 1.8 MB     00:00
(4/6): nodejs-npm-9.8.1-1.18.18.2.1.amzn2023.0.4.aarch64.rpm                                             15 MB/s | 2.0 MB     00:00
(5/6): nodejs-full-i18n-18.18.2-1.amzn2023.0.4.aarch64.rpm                                               20 MB/s | 8.5 MB     00:00
(6/6): nodejs-libs-18.18.2-1.amzn2023.0.4.aarch64.rpm                                                    31 MB/s |  14 MB     00:00
----------------------------------------------------------------------------------------------------------------------------------------
Total                                                                                                    46 MB/s |  34 MB     00:00
Running transaction check
Transaction check succeeded.
Running transaction test
Transaction test succeeded.
Running transaction
  Running scriptlet: nodejs-1:18.18.2-1.amzn2023.0.4.aarch64

Installed:
  libbrotli-1.0.9-4.amzn2023.0.2.aarch64                          nodejs-1:18.18.2-1.amzn2023.0.4.aarch64
  nodejs-docs-1:18.18.2-1.amzn2023.0.4.noarch                     nodejs-full-i18n-1:18.18.2-1.amzn2023.0.4.aarch64
  nodejs-libs-1:18.18.2-1.amzn2023.0.4.aarch64                    nodejs-npm-1:9.8.1-1.18.18.2.1.amzn2023.0.4.aarch64

Complete!
Verify NodeJS installation
Run node -v to check if you get the version or the error:
[ec2-user@ip-172-31-19-82 ~]$ node -v
v18.18.2
Build your NextJS project
Go to your NextJS project and run the build command
npm run build
You’ll see something like this once done:
$ next build
  ▲ Next.js 14.2.3

   Creating an optimized production build ...
 ✓ Compiled successfully
 ✓ Linting and checking validity of types
 ✓ Collecting page data
 ✓ Generating static pages (5/5)
 ✓ Collecting build traces
 ✓ Finalizing page optimization

Route (app)                              Size     First Load JS
┌ ○ /                                    5.44 kB        92.4 kB
└ ○ /_not-found                          875 B          87.9 kB
+ First Load JS shared by all            87 kB
  ├ chunks/23-0627c91053ca9399.js        31.5 kB
  ├ chunks/fd9d1056-2821b0f0cabcd8bd.js  53.7 kB
  └ other shared chunks (total)          1.86 kB


○  (Static)  prerendered as static content
Set up standalone NextJS server on EC2
Create a directory for the NextJS app:
sudo mkdir -p /var/www/nextjs-app
Give your user ownership of the directory:
sudo chown $USER /var/www/nextjs-app
Install NextJS and set up a basic server
Learn more about custom server on NextJS official docs.
Create a server.js in the project directory and paste the content below:
const { createServer } = require("http");
const { parse } = require("url");
const next = require("next");

const dev = false;
const hostname = "localhost";
const port = 3000;
// when using middleware `hostname` and `port` must be provided below
const app = next({ dev, hostname, port });
const handle = app.getRequestHandler();

app.prepare().then(() => {
  createServer(async (req, res) => {
    try {
      // Be sure to pass `true` as the second argument to `url.parse`.
      // This tells it to parse the query portion of the URL.
      const parsedUrl = parse(req.url, true);
      const { pathname, query } = parsedUrl;
      await handle(req, res, parsedUrl);
    } catch (err) {
      console.error("Error occurred handling", req.url, err);
      res.statusCode = 500;
      res.end("internal server error");
    }
  })
    .once("error", (err) => {
      console.error(err);
      process.exit(1);
    })
    .listen(port, () => {
      console.log(`> Ready on http://${hostname}:${port}`);
    });
});
Install next package
If you run node server.js you’ll get an error:
node:internal/modules/cjs/loader:1080
  throw err;
  ^

Error: Cannot find module 'next'
Require stack:
- /var/www/nextjs-app/server.js
    at Module._resolveFilename (node:internal/modules/cjs/loader:1077:15)
    at Module._load (node:internal/modules/cjs/loader:922:27)
    at Module.require (node:internal/modules/cjs/loader:1143:19)
    at require (node:internal/modules/cjs/helpers:119:18)
    at Object.<anonymous> (/var/www/nextjs-app/server.js:3:14)
    at Module._compile (node:internal/modules/cjs/loader:1256:14)
    at Module._extensions..js (node:internal/modules/cjs/loader:1310:10)
    at Module.load (node:internal/modules/cjs/loader:1119:32)
    at Module._load (node:internal/modules/cjs/loader:960:12)
    at Function.executeUserEntryPoint [as runMain] (node:internal/modules/run_main:86:12) {
  code: 'MODULE_NOT_FOUND',
  requireStack: [ '/var/www/nextjs-app/server.js' ]
}

Node.js v18.18.2
Simply run npm i next and try running the server again, you’ll get another error:
/var/www/nextjs-app/node_modules/next/dist/server/lib/router-utils/filesystem.js:151
            throw new Error(`Could not find a production build in the '${opts.config.distDir}' directory. Try building your app with 'next build' before starting the production server. https://nextjs.org/docs/messages/production-start-no-build-id`);
                  ^

Error: Could not find a production build in the '.next' directory. Try building your app with 'next build' before starting the production server. https://nextjs.org/docs/messages/production-start-no-build-id
    at setupFsCheck (/var/www/nextjs-app/node_modules/next/dist/server/lib/router-utils/filesystem.js:151:19)
    at async initialize (/var/www/nextjs-app/node_modules/next/dist/server/lib/router-server.js:61:23)
    at async NextCustomServer.prepare (/var/www/nextjs-app/node_modules/next/dist/server/next.js:242:28)

Node.js v18.18.2
Copy .next build folder to EC2 server
Lets use rsync and transfer our build folder to EC2 instance
rsync -avPz .next [email protected]:/var/www/nextjs-app/
Now if you run node server.js, you’ll see it works:
[ec2-user@ip-172-31-19-82 nextjs-app]$ node server.js
> Ready on http://localhost:3000
Preview NextJS app in your browser
You’ll first need to open port 3000 from security group.

If you go to the your.ec2.ip.addr:3000, you’ll see the preview of your app.

Get ready for production
Install pm2 and use it run your node server continuously
Install pm2 via NPM:
npm i -g pm2
Start your app by running:
pm2 start server.js
Set up custom domain and SSL with Caddy
- Point your domain to EC2 IP
- Install and set up Caddy as a reverse proxy
- Setup CDN like CloudFront or Cloudflare for caching
That’s it! You’re ready to go.
I hope you enjoyed reading till here and found the article helpful. Spread the knowledge by sharing this article.